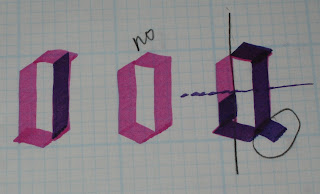

For letters after the hangover letters, don't write the square serif and overlap the downstroke if necessary for correct spacing:
Handout: Lombardic capitals – these letters will be used for the first 2 lines of the illuminated manuscript project.
Goal for this week: practice the text you’ll be using in your project with the 1 1/2 mm Brause nib, x-height = 2 boxes (1/4-inch). Write on the see-through paper that DeAnn provided in class using the project template as a guide. For those who’ve taken DeAnn’s copperplate class, the cotton comp paper can be used for practice.
Decorative Capital for illuminated manuscript project: The decorative capital is the first letter of your text. Find a decorative capital from the books DeAnn brought to class or from online sources and trace it or download it. It should be 2-inch by 2-inch in size so resize it as needed; use the template as a guide.
Tip for tracing: if you don’t have a light-table, put white paper underneath the sheet you’re tracing to better contrast. Use a sharpened pencil with 2H lead. A harder lead is better for getting a thin line that won’t smudge easily.
DeAnn demonstrated gilding the decorative capital:
1. Trace the letter using a pencil with 2H lead onto the pergamannata paper.
2. Paint the glue mixture (2/3 Sobo glue, 1/3 water, some red watercolor to tint it so you can see it when dry) into the letter using a pointed synthetic #1 brush. You want to pull the glue so that it’s smooth. Use big broad strokes, not dabs. Paint on top of the pencil outline; it’s better to go outside the pencil lines than stay within the lines. You can always scrape away the excess later.
3. Paint 3 thin layers of glue. Make sure each layer dries completely before painting on the next layer of glue. Rinse your brush after each layer so that the glue doesn’t dry on the brush.
4. TIP: don’t let the brush sit in the water – this will ruin the tip.
5. Once the glue is dry, breathe on it to re-moisten the glue (BEWARE: remove any lipstick or chapstick from your lips first). Then place the gold-leaf on top (gold side down) and rub gently.
6. Remove the backing. Using a soft brush, brush away the excess gold.
7. Using a #16 blade in your x-acto knife, scrape the edges of the letter to smooth it and remove any gold glued on outside the outline.
8. Burnish the gold with an agate burnisher.
HOMEWORK: For the next class, bring the decorative capital that you want for your illuminated manuscript project. It should be a 2-inch by 2-inch size to fit into the area on the project template. DeAnn will bring the supplies so we can practice gilding this decorative capital.


No comments:
Post a Comment