Homework review:
If you encounter drag on the upstroke when writing with the 5mm nib on the blue grid paper, try switching to the black grid paper. It seems to have a smoother surface and also bleeds less.
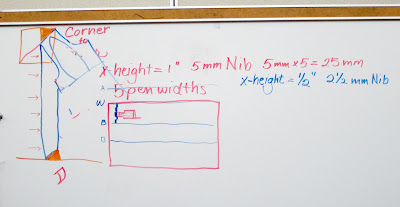
Be aware of your pen angle; if it’s too flat (i.e. less that 45-degrees), then the down-strokes will be thicker and the letters will look heavier on the page. Before you start a stroke, make sure your nib goes from corner-to-corner at a 45-degree angle.
 |
| The correct pen angle for Italic |
Use heavier pressure on the down-stroke, lighter pressure on the up-stroke. Keep the nib flat on the paper.
The x-height (space from waist to base) for the 5mm nib is 1-inch. The x-height for the 2.5 mm nib is ½ inch (or 4 boxes on the 8x8 grid paper). Remember to line the paper correctly so that the letters will be the correct height.
 |
| Lining the grid paper for the 5 mm nib; x-height = 1 inch (step 1) |
Lining the grid paper: For the 5 mm nib, the black grid paper already has darker lines 1-inch apart. Label the lines as ascender, waist, base, descender, or put an “x” on the line to write on.
If you’re using the blue grid paper, line the paper at 1-inch intervals with a pencil so that it’s clear where the waist and base lines are. Using the 18” C-thru ruler easily creates a 2-inch margin on each side of the 17x22 sheet. By placing it in the middle, you don’t have to move it back & forth, just downward as you draw the lines with a sharp pencil, preferably with 2H lead. The grid of the ruler matches the grid paper (on the 1-inch = 8 boxes side of the double-sided grip paper, the Beinfang paper with the blue lines is the same-size grid on both sides). Match the appropriate line of the ruler to the grid and make the 1-inch lines darker.
For 2.5 mm nib, the x-height is ½-inch, so you need to draw lines between the darker lines on the 8x8 grid paper. Because pencil is hard to see against the black lines, use a colored thin marker or sharp color pencil.
 |
| Lining the paper for the 2.5 mm nib; x-height = 1/2 inch (step 2) |
Accuracy is more important than speed. If using a pencil, twirl it slightly as you line so that it stays sharp. Hold the ruler with your left hand and with your right hand, draw the line from left to right.
If the 17x22 paper is too large and unwieldy to write on at the ½-inch x-height, tear it in half and then line it.
Drawing the slant lines:
The typical slant for Italic is 3 – 15 degrees. We’re going to use 5-degrees. You can use a protractor to make the first slant line. Then use the 18” c-thru ruler to make parallel lines ½-inch or 1-inch apart for the rest of the page.
Shortcut to make the 5-degree slant without a protractor: Make 2 dots 11-inches apart vertically. Then make a 3rd dot 1-inch away horizontally from the top dot. Connect the bottom dot and the 3rd dot and you’ll have a 5-degree slant line.
 |
| grid paper lined for the 2.5 mm nib with slant lines of 5-degrees |
The exit serif (see Italic minuscule handout) should go in the direct of the pen angle to make a “hairline serif.” It’s not a flick; follow through the stroke on the paper.
 |
| radius of exit serif should be small. the one on the "i" is too big. |
 |
| entrance serifs, picket-fence spacing, exit serifs |
This is step 3. Step 1 is writing with the 5 mm nib at 90-degrees (i.e. no slant). Step 2 is writing with the 2.5 mm nib at 90-degrees. Step 3 is writing with the 2.5 mm nib with a 5-degree slant.
HOMEWORK: Write alphabet sentences or other text with the 2.5 mm nib at a 5-degree slant. Remember to line the paper accurately. It might seem tedious, but it’s important to have the paper lined correctly.


No comments:
Post a Comment