
First DeAnn explained the proper posture for writing so that you can move your whole hand. Sit at a slight angle to the table so that your right arm can rest on the table. User your left hand as an anchor. Left-handed folks should do the reverse. Use several sheets of paper underneath the sheet you're writing on for some padding. We'll be using a pencil on regular blank paper and use the 1/2-inch guidelines.
DeAnn explained the guideline sheet - we started with the 1/2-inch x-height guidelines. The x-height is the height on the letter x (or n, a, c, etc. - any letter without ascenders or descenders), waist is its height and base is the line on which the letter sits. The ascender-line is the height of the letter l and the descender-line is the length a letter like g dips below the baseline.

For monoline italic, the ascender and descender are the same height as the x-height.
The 1/2-inch x-height guideline in the handout has a 5-degree slant, which is the slant for Italic. All vertical strokes should be written parallel to the slant line. However, the Italic Monoline exemplar has no slant, so you can practice on the grid-paper and not worry about the slant line yet if you prefer.
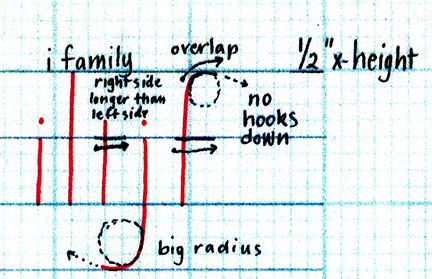
First DeAnn had us write an i from the waist to the base, parallel to the slant. Then we practiced the l from ascender to base. For the "t", the crossbar is longer on the right side. For the "f", start slightly below the ascender.
o-family: For the "o", start slight below the waist for the first stroke, then overlap the second stroke at the start and end. The "e" loop ends with a horizontal stroke, not a slanted one.

branching-family: for the "n", go down, back up halfway, branch out, hit the waist line, then go down. Be aware of the distinct triangular shape made by the branching-out stroke of the "n"; it's not a Roman arch. The "b" is like an "h" except start to curve slight above the base, then connect to the first stroke along the base. For the "r", branch-out above the half-way point, as you don't want to make the letter too wide. For the "p", after pulling the first stroke down to the descender, lift your pencil and start at the base to form the branching-out stroke.

a-family: the "u" should be exactly like an upside-down "n". For a, g, q, and d, start at the waist and curve slightly before making the "u"-shape. Then connect the top.

diagonal family and s: if you're using the guidelines with the slant, for v & w, make the first downstroke straighter and the second stroke more slanted. This gives the impression that the letter is parallel to the slant.

For the "s", practice on the 8x8 grid paper by drawing a 1/2-inch rectangle that is 4 x 2 boxes. Draw a line at the midpoint and sketch a circle in each square. Then the main stroke of the s follow the curves and the top and bottom ending strokes are straighter than the circular curves.

Don’t move your wrist when writing – for long downstrokes, move your whole arm. Remember to use your left hand to anchor the paper. Using the other hand also helps to keep you from clenching your writing hand too tightly.

Picket Fence spacing: for Italic monoline (and Italic,),picket fence spacing means that all the counterspaces, or negative spaces, match. The positive spaces (i.e. the strokes or the “pickets” of the fence) are equidistant. The counterspace is the inside space of the letter. This will be the basis of flourishing that you’ll learn later. If the picket fence foundation isn’t strong and steady, the flourishing will look weak. DeAnn says "look at the space you just created and create one that's similar."
HOMEWORK: Practice the Monoline Italic alphabet with pen or pencil on regular paper or 8x8 grid paper. Trace the letter on see-through paper or tracing paper. DeAnn's mantra is: quality of practice is more important than quantity of practice. Slow down and really study the exemplar.
Remember to put your name and date in the lower right-hand corner. DeAnn will review all homework and make corrections where needed.